
Making a Temperature Quilt - all the details!
- Julie Robertson

- Jan 1, 2023
- 8 min read
Updated: Dec 17, 2025
I designed the Koru Geese Block many years ago as a template to make a Temperature Quilt. The pattern has been updated a couple of times, and assumes that the sewer knows how to paper piece and also understands how to make a Temperature Quilt.
So what is a Temperature Quilt?
Temperature quilts are a record of daily temperature highs and lows that occur throughout a year, in a particular place. Usually from 1 January to 31 December. The record is like a daily diary 'written' in fabric and colour, not words. Making your own temperature quilt can be a fun and creative way to track the weather and the changing seasons. Generally, two temperatures are recorded daily - a high and a low. The high temperature is usually in the middle of the day and the low is usually overnight. In terms of fabric colour, you might use blue fabric to represent cold temperatures and red fabric to represent hot temperatures. You then create a scale of fabrics between red and blue, that correspond with temperatures. This scale will be your reference to determine which colours you use.
While temperature quilts generally record the current year, you could also use a website like wunderground.com to gather historical data to make a quilt as a gift using a special birth year or anniversary.
One of the shortcomings of the Koru Geese Block pattern is that it doesn't provide any information on choosing fabrics or using a temperature scale. Part of the reason I didn't include this information is that the pattern isn't only for temperature quilts. You can use the pattern by incorporating it into pillows, tote bags, and pouches or use it to explore colours and patterns in other ways, for example, a rainbow quilt. There are some ideas at the end of this post.
I thought it would be helpful to give you all the details of my temperature quilt to help guide you in making some decisions with your own temperature quilt, along with ideas from other designers.


Do a little research first
One of the first things I did before gathering my fabrics, was to ask myself:
Do I want to record a region; state; city or suburb? To answer that I did some research into the historical temperature ranges recorded locally and in the wider region where I live. I quickly realised that I didn't want to record the city-wide high's and low's as there was some variation from north to south. The temperatures locally - within my suburb - tracked a little higher during the day and a little lower overnight. I decided that I wanted a record of the temperatures I had experienced on a day-to-day basis, so local it was. If your local temperature isn't available, you might need to broaden your temperature area to city-wide. If you can measure your local temperature yourself, this could be an interesting option too. I found the microclimate comparisons quite interesting. The Koru Geese Pattern works best when two temperatures are recorded. I chose to record the daytime high and the following overnight low.

My next big question was:
How many degrees of temperature would I include in my scale? In Auckland, we have a narrow range in temperatures and we use Degrees Celsius to measure temperature. The graph to the right gives an example of average Auckland temperatures. I was able to easily assign one fabric colour to each degree. In hindsight, I would have assigned my daytime highs from 12°C to 28°C and my overnight low temperatures from 2°C to 21°C. Bear in mind that if you use a table like the one to the right, which shows average temperatures, the temperatures you actually record are likely to fall above and below those on the graph.
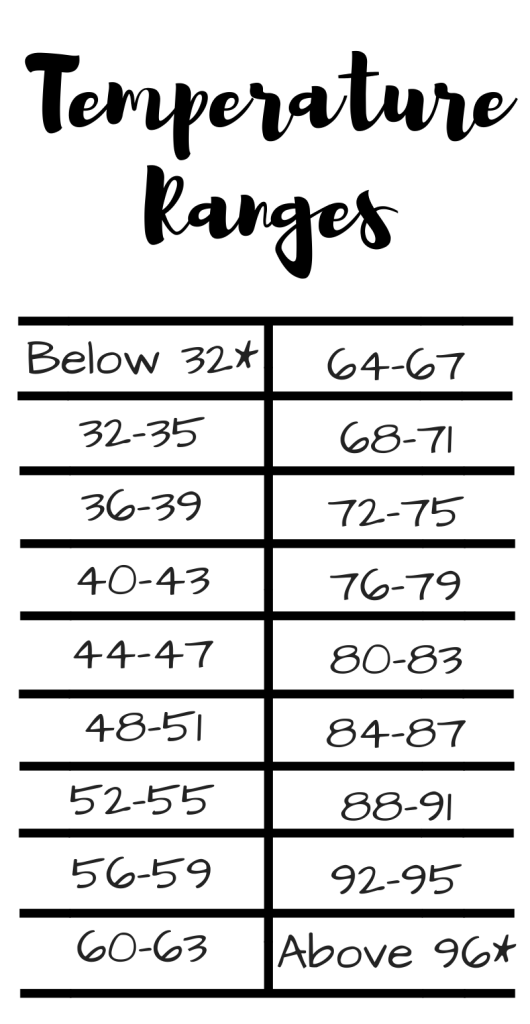
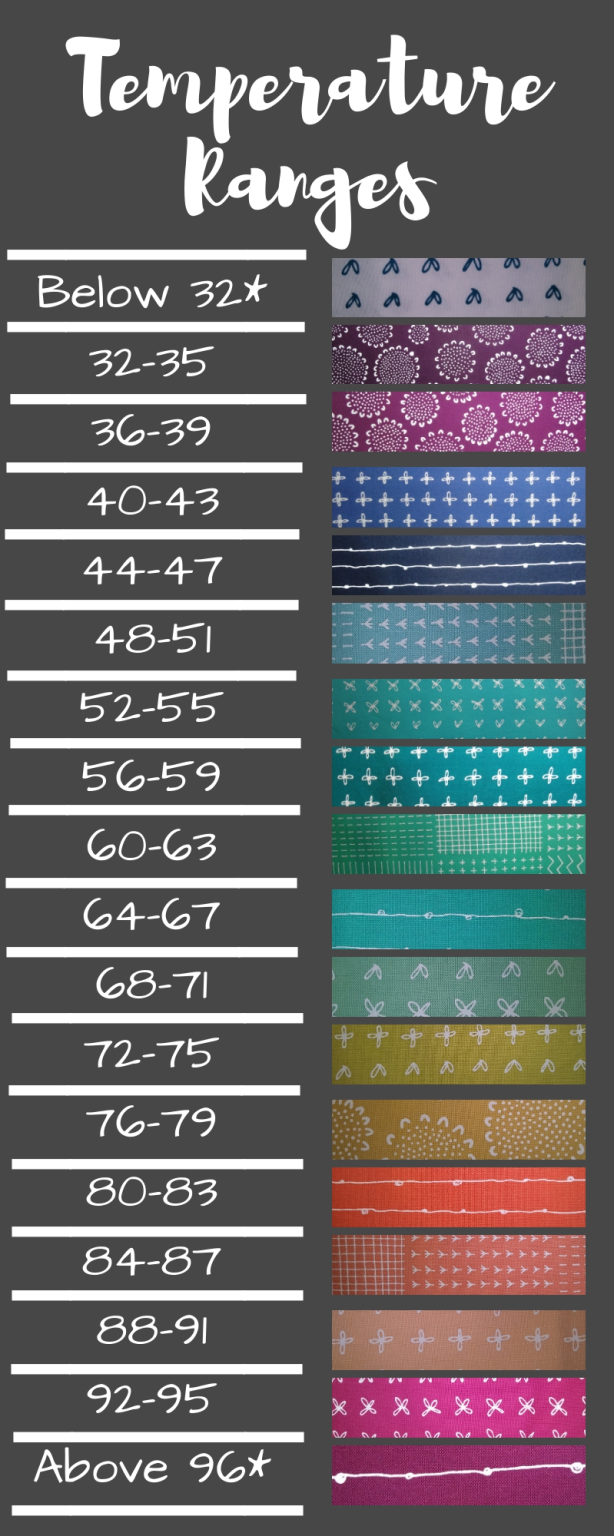
If you measure and record temperatures in Fahrenheit, it will be easier to use temperature ranges. The images below show the temperature ranges by www.darcyquilts.com. She used 4°F increments so she could use more fabrics. Depending on the temperature range where you live, you could use 5°F or 10°F increments.
Things to Consider
I recommend having a plan for what you'll do if your temperatures fall outside your temperature range. I decided to assign my daytime highest temperature fabric to 27°C and above, and the lowest to 13°C and below. I did the same with my overnight low fabrics. The downside of this was that we had a hot summer and days where the highs and the (highest of the) lows ended up being the same colours over several days. Once the quilt is finished, it won't matter though. It will still provide a great representation of the temperature changes throughout the year. And no one will really know what the actual temperatures were, not even me!
Something else to consider is whether you'll use a single set of fabrics for your temperature ranges (like www.darcyquilts.com has done) or if you will split them - as I have done - into daytime highs and overnight lows. I graduated my fabrics from red for hot, to blue for cold. I used Kona Solids for the daytime temperatures, and I used Essex linens for the overnight lows. Some of my Essex linens have a shimmer, and some do not; this offers some movement and variation throughout the quilt. Using different fabrics for the 'geese' of the Koru Geese block allows them to stand out more.
Solid fabrics are an obvious choice. However, I've seen batiks and blenders used with success. If you decide to use two sets of fabric ranges, you will need almost twice the number of fabrics.
Download my Fabric Swatch Template. It's a simple tool designed to help you label, organise, and return to your temperature quilt fabrics with ease, whether you're sewing every day or working in batches.
The picture below right shows a Temperature Quilt Range and Colour reference from www.elmstreetquilts.com using 10°F increments.

Ensure you have a designated place to record your daily temperatures. This is important both when you can't access your quilt each day and when you're out of town or on holiday, needing to record temperatures for easy reference later. I quickly realised that my suburb temperatures were not easy to find a day or two later. City temperatures are relatively easy to find historical data on, but suburban temperatures are not as readily available. Find a website you're comfortable navigating, bookmark it, and refer back to it when needed. It became an evening routine to jot down the previous overnight low and daytime high. I happen to use a paper diary and also have some monthly stickers, which I found useful for recording my temperatures. Something to note is that you don't necessarily need a calendar that shows days, months and the year. A perpetual calendar will do. Simply note the name of the month (and year if you wish) on each month so you can keep them in order.


Using the Koru Geese Block Templates
The following instructions assume you will be using daytime highs and overnight lows. If you've chosen a different way of representing your temperatures, you will still find these instructions useful.
You'll need four templates from the Koru Geese Block pattern to make one complete block - which represents one month of temperatures. There are 32 'geese' (triangles) on each completed block. This was the logical solution to create an even-looking block, but it means that some 'geese' at the end of the month will not be used. How you paper piece these final pieces is up to you. I chose to continue using the last fabric to complete the block.
The 1st of the month starts with the daytime high temperature on 1 (on the template) followed by the overnight low on both 2 and 3.
The daytime high for the 2nd day of the month is sewn on 4, with the overnight low sewn on 5 and 6.
The daytime high for the 3rd day of the month is sewn on 7, with the overnight low sewn on 8 and 9.
And so on.
Writing the temperatures on the template before starting does make it easier to keep track of where you're at while sewing. I generally waited until I had 8 days of temperatures before completing one-quarter of the finished block. You can sew a 'geese' each day if you wish. I also recommend writing the month on the template, too, and leaving the paper templates on your blocks until you are ready to sew your finished quilt together. This way, you won't have to wonder which month is which!


Completing your Blocks and Quilt
Once you have four completed templates (one month), sew the templates together as described below and as shown in Fig. 1.
1. Place your four completed templates on your work surface and rotate each block so that a circular shape is created.
2. Sew Row 1. Place two templates RST, sew with a 1/4" seam allowance. Press the seam to the right.
3. Sew Row 2. Place two templates RST, sew with a 1/4" seam allowance. Press the seam to the left.
4. Sew Row 1 and 2 together. Place RST, nest seams and sew with a 1/4" seam allowance. Press seam open.
The final seam is pretty bulky, so take it slowly.


Now that you have your blocks sewn together, it's time to decide how you will sew them together into a finished quilt. Here are some ideas!
Sewing the Koru Geese Blocks together with no sashing will result in a quilt similar to the one on the right. There is some space between each flying geese circle to allow them to stand out individually. This quilt will measure 36" x 48", which is a relatively small size, making it ideal for a wall hanging or baby quilt.

If you are looking to make a larger quilt, or you'd like to avoid those bulky seams, adding sashing is a good option. The image to the left shows the Koru Geese Blocks sewn with 2½" sashing strips, which once sewn together will be 2" wide. This quilt will measure 44" x 58", which would be a small lap-size quilt. Additional or wider sashing could be added to increase the finished quilt's size.
If you're not making a temperature quilt, additional blocks and sashing could be added to make an even larger-sized quilt.

The final image, to the right, illustrates various ways the blocks can be sewn together to achieve different effects. Depending on your fabric and colour choices, this is a versatile pattern suitable for any age or gender. I've shown the quilt with cornerstones and sashing, but there are countless options, including various colours and fabric textures.
NEW! The Koru Geese Temperature Quilt Workbook is a comprehensive guide designed to help you plan and sew your very own temperature quilt. From researching temperature data and selecting your colour ranges to mapping fabrics and planning your sewing rhythm, this workbook provides a dedicated place to document every decision so you can return to your quilt with clarity and confidence at any point during the year.
Created for quilters who enjoy thoughtful planning as much as the sewing itself, the workbook supports both daily and batch sewing styles. It includes worksheets, checklists, and planning tools that turn a year's worth of temperature data into a cohesive, meaningful quilt.
I hope this blog post was helpful and inspires your creativity in using the Koru Geese Block. If you have any questions, please don't hesitate to contact us. We're always happy to help and love to hear from our Quilty friends.
Happy sewing, friends!


Great information about Temperature Quilts Julie! Thanks for taking the time to share the details.