
How to Attach Quilt Binding
- Julie Robertson

- May 3, 2025
- 3 min read
There are many ways to attach binding to a quilt, and this is one of my favourites. It features a diagonal seam that aligns with the seams of your other strips. I prefer to machine-stitch my binding to the front of the quilt, fold it to the back, and then hand-stitch it in place. But as always, find the method that suits your style best.
1. Create a Point at One End of the Binding
Open the folded binding so it is flat, with the short raw edge point up. Image 1.
Fold the right corner of the fabric down to meet the left-hand raw edge. (This is Fold A.) Image 2.
Press the fold.
Fold the binding in half, wrong sides together (WST), as it was initially, and press again. (This is Fold B.) Image 3.
You should now see a pointed tip on the raw edges of the binding strip.


2. Attach the Binding to the Quilt Front
Line up the raw edges of the binding with the raw edges of the quilt's front. The folded edge of the binding should face inwards, toward the quilt centre.
Pin or clip the binding in place.
Start sewing about 6–8 inches away from the pointed end using a ¼" seam allowance. Backstitch at the start.
3. Mitre the Corners
When you reach a corner, stop ¼" before the edge.
Pivot your quilt and sew directly into the corner. Backstitch to secure.
Trim threads and remove the quilt from your machine.
Fold the binding perpendicular to the sewn edge, creating a diagonal fold.
Fold the binding strip back on itself, aligning the raw edges with the next side of the quilt.
Pin or clip in place, then sew the next side starting ¼" from the corner.
Repeat this mitring process at each corner until you return to the side where you began.
4. Join the Binding Ends
Stop sewing 6–8 inches from your starting point. Backstitch and remove the quilt from your machine.
Lift the pointed end of the binding up and out of the way.
Place the other end of the binding along the quilt edge, sliding it under the pointed tip.
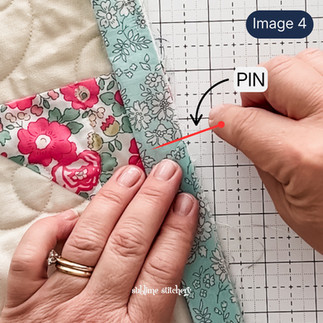
Overlap the pointed tip back over the top and place a pin where the tip of the point meets the raw edge of the quilt (through the binding only, not the quilt sandwich). Image 4.
Open this section of the binding with the right side up, ensuring the pin remains in place.
Rotate the pointed tail so it lies perpendicular to the other strip, right sides together (RST).
You may need to fold the quilt to bring the two binding ends together.
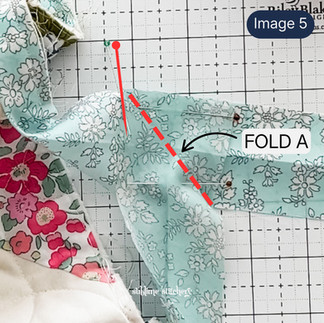
Line up the top point of Fold A with the pin. Image 5.
Pin the two strips RST, and sew along Fold A. Image 6.
Check the fit: Unfold the quilt to ensure the binding join is smooth, neither too tight nor too loose.
Adjust the seam if needed. Then trim excess fabric to a ¼" seam allowance.
Press or finger-press the seam open. Image 7.
Lay the quilt flat and sew the remaining section of binding to the quilt. Image 8.


5.Fold and Secure the Binding
Press and fold the binding to the back of the quilt, covering the raw edges of the quilt sandwich.
Use pins or clips to hold it in place.
Tuck and fold each corner neatly to create sharp mitred corners.
Hand-Stitch the Binding to the Back of the Quilt
I prefer to hand-stitch my binding in place on the back of the quilt for an almost invisible finish. But if you like, you can use a visible running stitch, sometimes called Big Stitch Binding or machine-stitch this step instead.
Cut a length of thread about 20" long.
Secure it by tying a small knot into the seam allowance under the binding.
Use a slip stitch for small, hidden stitches.
Repeat this stitch along the full length of the binding.
When finished, tie a knot and bury the thread end inside the quilt.
Happy Stitching!


Comments